Instagram Cinematic Flash Filter AI Photo Editing Prompt – A specific type of “cinematic photo” has gone viral on Instagram—so much so that you have likely already come across it. Users are creating and posting various videos where they first display a standard photograph, and then reveal its transformation into a cinematic-style image. It is worth noting that this effect can be achieved in two distinct ways, and I am going to walk you through both methods. You are free to follow whichever method you prefer to create your own version; the process is actually quite simple. Just follow the straightforward steps I outline here precisely, and see for yourself just how impressive the results turn out. If, for any reason, your results differ even slightly from what is expected, please let us know in the comments section.
Details Of Instagram Cinematic Flash Filter AI Photo Editing Prompt
Look, to create a photo like this, the first thing you need to understand is what the final result actually looks like. It converts your image into a cinematic blue tone; for instance, if you start with a standard photograph, it won’t go so far as to completely alter the background. Instead, it transforms the image into a cinematic style while preserving its original, natural background. If you were expecting a different kind of manipulation—such as a complete background replacement—then you won’t find that type of editing here. The editing process here is designed to work as if you had uploaded a professional-grade photo that is already fully edited and simply requires a color grade. You simply add your image, and the tool applies the necessary color adjustments to finalize it. That is precisely how the editing works, so you should decide beforehand to prepare your photo in advance, ensuring it is fully edited and ready for you to apply this specific color grade.
What Type Images Are Going Viral?
First, understand that the colors currently going viral are actually being applied through Instagram’s own editing tools; you do not need to perform any separate, external editing. However, many users are unable to locate this specific option within the app. For this reason, I will explain how to achieve this using a custom method. To begin, simply open both CapCut and Instagram on your device, and then navigate to the ‘Stories’ section. There, you will find an option labeled ‘Re-style.’ If you tap on this, you will be presented with various options to modify your photo. As you scroll through the options at the bottom, you will discover a wide range of different filters. Among these, you will find a specific filter named ‘Flash.’ As soon as you select it, it will be instantly applied to your photo. In this way, you can easily add these distinctive colors to your standard photos.
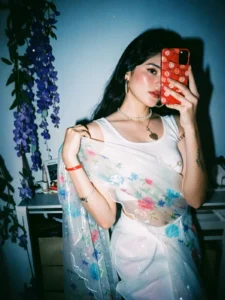
Apply a strong direct flash effect with high exposure and harsh lighting. Increase contrast and sharpness significantly. Add cool cyan/blue tones to shadows while keeping highlights slightly blown out. Skin tones should appear bright and slightly washed with a glossy flash look. Boost whites and reduce midtones for a punchy, high-fashion aesthetic. Add subtle noise and grain for a raw camera flash feel. Background should look darker and metallic with reflections enhanced. Overall look: paparazzi flash, night photography, bold, dramatic, Instagram restyle "flash" filter style.
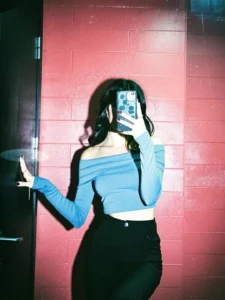
A high-contrast mirror selfie of a woman with long dark wavy hair. She is wearing a dusty blue off-the-shoulder long-sleeve crop top and high-waisted black trousers. She is holding a smartphone with a decorative case in front of her face, obscuring it. She stands against a vibrant red brick wall under a harsh overhead light that creates deep shadows and a cinematic film-noir vibe. The photo has a slightly grainy, 35mm film aesthetic with visible flash-glare and a cool-toned, moody atmosphere
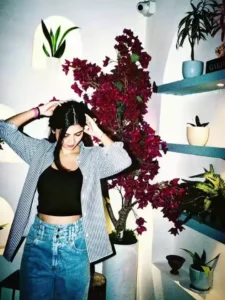
Apply a strong direct flash effect with controlled exposure. Increase contrast deeply with rich blacks and slightly crushed shadows. Add cinematic teal tones in shadows and warm orange tones in highlights (teal & orange look). Reduce overall brightness slightly while boosting color depth and saturation. Skin tones should remain warm, natural, and slightly glossy. Enhance texture and sharpness while keeping a soft highlight glow. Add subtle vignette and light grain for a cinematic feel. Background should appear darker, moody, and slightly desaturated with metallic reflections. Overall look: deep cinematic flash photography, dramatic, rich colors, Instagram restyle flash + cinematic blend.
How To Create Flash Light Effect In You Image
Now, regarding the editing process I’m about to explain: first and foremost, understand that many users are unable to locate the “Real Style” option. To fix this, begin by applying a simple workaround: observe that both images and corresponding prompts are provided here. Select the image you like best, and then copy the prompt located directly beneath it. Note that a “universal prompt” has been utilized here—one that is suitable for use by both men and women. Copy the prompt, and then proceed to open Google Gemini. Upload the specific photo you wish to transform, and you will then find a “Generate” button to initiate the process. These stylistic colors will be seamlessly applied to your standard photo, thereby allowing you to effortlessly convert it into a professional-quality image.
Conclusion
You can create it in two ways. I’ve also shared alternative options here, allowing you to easily create your photos in a completely professional manner. You can see for yourself here, and the results will be excellent.